
PET Bottle Shrinkage and Deformation After Hot Filling: Root Cause Analysis
Who Faces This Problem
Beverage manufacturers running hot-fill lines for juices, teas, functional drinks, or flavored water frequently encounter PET bottle shrinkage, paneling, or base deformation after the product enters the container at elevated temperatures. The defect often appears intermittently — some batches pass inspection while others show visible collapse near the shoulder, base, or label panel.
For operations leads and procurement managers, this is not just a cosmetic issue. Deformed bottles jam conveyors, trigger rejection at the capping or labeling stage, and create downstream packaging waste. Understanding the root cause is the first step toward stabilizing output.
The Direct Answer: Why PET Bottles Shrink After Hot Filling
PET (polyethylene terephthalate) has a glass transition temperature (Tg) of approximately 70–80°C. When liquid enters the bottle above this threshold, the polymer chains in the bottle wall soften. If the bottle lacks sufficient thermal resistance — due to material grade, wall thickness, or crystallization level — the internal heat causes the structure to relax and contract.
Three primary mechanisms drive visible deformation:
- Thermal relaxation shrinkage — The bottle wall softens and pulls inward under its own residual stress from the blow-molding process.
- Vacuum paneling — As the hot liquid cools inside a sealed bottle, internal pressure drops. Without adequate vacuum panel design or nitrogen dosing, atmospheric pressure crushes the weakest section of the bottle.
- Base distortion — The petaloid base, designed for carbonated beverage pressure, may invert or warp when exposed to hot-fill temperatures without proper crystallization treatment.
Root Causes to Investigate First
1. Bottle Material and Preform Specification
Not all PET preforms are rated for hot-fill applications. Standard water-grade PET preforms are optimized for ambient filling and lack the thermal stability required for liquids above 65°C.
What to check:
- Confirm the preform supplier specifies a hot-fill grade with higher intrinsic viscosity (IV) and controlled crystallization.
- Verify preform weight relative to bottle volume — hot-fill bottles typically require 15–30% more material than ambient-fill equivalents to maintain wall rigidity.
- Request the preform's thermal resistance test data (usually measured as shrinkage percentage at 85°C for 30 minutes).
2. Filling Temperature vs. Bottle Tolerance
Hot-fill processes typically operate between 85°C and 92°C to achieve commercial sterility. However, if the bottle's heat-set blow-molding process did not achieve adequate crystallization in the shoulder and base regions, even standard hot-fill temperatures will cause collapse.
What to check:
- Measure actual fill temperature at the nozzle — not just the holding tank reading. Temperature drops or spikes in the transfer piping can create inconsistent thermal loads.
- Compare the fill temperature against the bottle supplier's stated maximum thermal resistance. A 3–5°C margin is standard practice.
- Inspect rejected bottles for localized thinning — this indicates the blow-molding oven profile needs adjustment.
3. Cooling Tunnel Performance
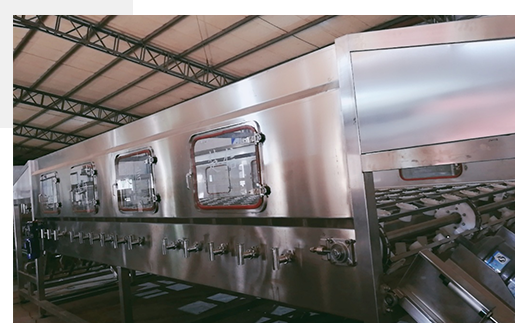
After capping, hot-filled bottles must pass through a cooling tunnel that gradually reduces the product temperature to below 40°C. If the cooling tunnel is undersized, has uneven spray coverage, or runs at insufficient belt speed, bottles remain at elevated temperatures long enough for deformation to set in.
What to check:
- Measure bottle surface temperature at the cooling tunnel exit. It should be below 40°C before entering the labeling or packing zone.
- Verify water spray nozzles are not clogged and that spray patterns cover the full bottle circumference.
- Check belt speed against the tunnel's rated throughput — overloading reduces dwell time and compromises cooling.
4. Vacuum Panel and Nitrogen Dosing
For bottles without designed vacuum panels, the negative pressure created during cooling has nowhere to distribute evenly. This causes random paneling — usually on the flattest section of the bottle wall.
What to check:
- Confirm the bottle design includes vacuum relief panels or ribbing engineered for hot-fill pressure differentials.
- If nitrogen dosing is used to create positive headspace pressure, verify dosing volume and timing relative to the capping station. Inconsistent dosing leads to batch-level variation in deformation rates.
Corrective Actions and Their Boundaries
| Failure Point | Corrective Action | Boundary / Limitation |
|---|---|---|
| Preform grade mismatch | Switch to hot-fill rated preform with higher IV and crystallization | Requires new blow-molding oven profile; cannot use existing ambient-fill molds without revalidation |
| Fill temperature too high | Reduce fill temperature within the 85–88°C range | Must still meet product sterility requirements; lower temperatures may require extended hold times |
| Cooling tunnel undersized | Extend tunnel length or reduce line speed | Line speed reduction affects overall throughput; tunnel extension requires floor space and utility connections |
| No vacuum panel design | Redesign bottle mold with engineered vacuum panels | Mold change involves lead time and cost; existing inventory of preforms may not be compatible |
| Inconsistent nitrogen dosing | Calibrate dosing valve and verify headspace volume | Dosing systems require regular maintenance; liquid nitrogen supply logistics must be confirmed |
When to Involve Your Equipment Supplier
If shrinkage persists after verifying bottle material, fill temperature, and cooling performance, the issue may lie in the filling valve design or the bottle handling mechanics within the monoblock unit. Hot-fill applications require filling valves engineered for thermal expansion compensation and drip-free closure — standard ambient-fill valves can introduce localized heat concentration that weakens the bottle neck.
Chuxin Mingwei's bottled water and beverage filling lines are configured based on the specific product temperature, bottle material, and capacity requirements of each project. When evaluating a hot-fill line, the selection process must confirm:
- Bottle preform specifications (weight, IV, crystallization data)
- Target fill temperature and product hold time
- Cooling tunnel sizing relative to line speed
- Cleanroom and air filtration requirements for the filling zone
These parameters determine whether a standard rinse-fill-cap monoblock is sufficient, or whether a heat-set blow-molding integration with dedicated hot-fill valves is required.
Practical Next Steps
- Collect samples — Pull 10 deformed bottles from different positions on the line (start, middle, end of a production run) and record their exact location and time.
- Measure temperatures — Log fill temperature, bottle surface temperature at capping, and bottle surface temperature at cooling tunnel exit.
- Request preform data — Ask your preform supplier for the hot-fill shrinkage test certificate and compare it against your actual fill temperature.
- Audit cooling tunnel — Run an empty-bottle test through the tunnel with thermal labels to map spray coverage and identify dead zones.
- Consult your line integrator — Share the collected data with your equipment supplier to determine whether the issue is bottle-side, process-side, or equipment-side.
Hot-fill line stability depends on matching every component — from preform to cooling tunnel — to the thermal profile of your specific product. Partial fixes rarely hold across production shifts.